We at Paintings Studio today are pleased to present to you information about Lungkata Tjungurrayi, or in its full name “Shorty Lungkata Tjungurrayi”. is a Pintupi man born at Walukuritji (c. 1920 – 1987) south of Lake Macdonald, and is best known as an artist, and important member with Papunya Tula Artists.
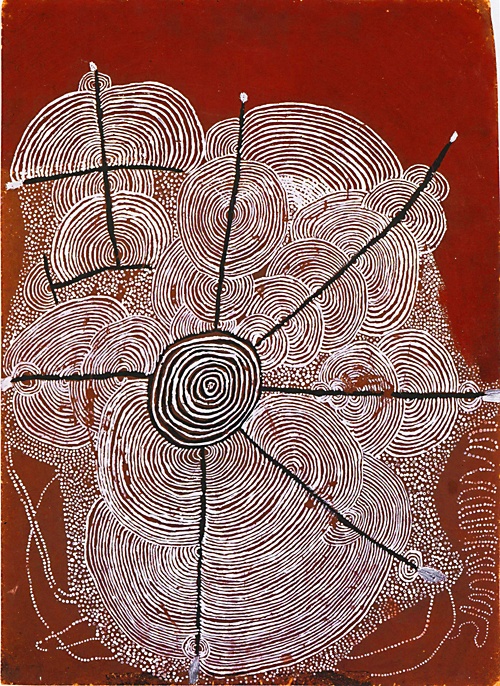
Children’s Water Dreaming 1972, 62 x 44 cm, Shorty Lungkarta Tjungurrayi
Aborigines used Australia’s wealth in ochre colors (iron oxides) to paint their mythologies on sand, cut bark of stringybark tree and their bodies. In 1972, acrylic paints and masonite boards were made available to a few Aboriginal men congregating in a ‘painting club’. While the usage of contemporary materials served to adulterate, it also helped to popularize Australian Aboriginal art.
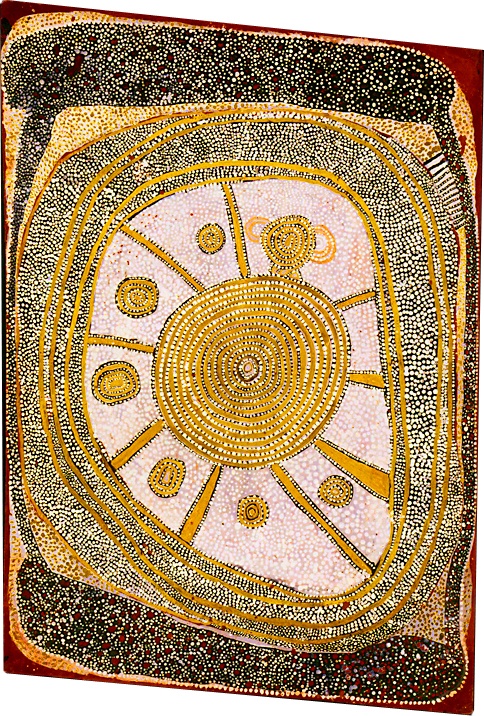
Classic Pintupi Water Dreaming 1972, 62 x 42 cm, Shorty Lungkarta Tjungurrayi
Last year, early ‘Papunya’ boards were shown at the Grey Art Gallery, NYU. Paintings from the exhibition are reproduced in a book icons of the desert that also provides anthropological information on Aboriginal art and artists.
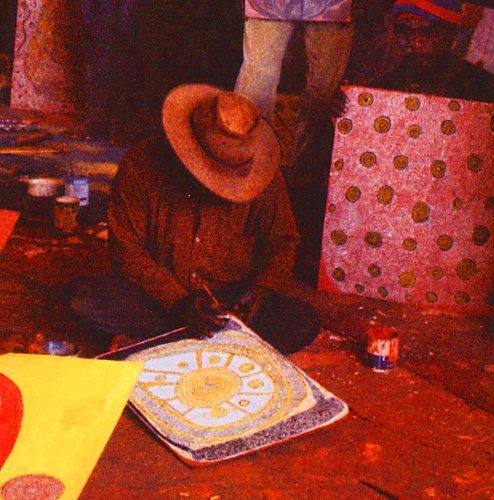
Shorty Lungkarta Tjungurrayi, detail of a group portrait, Men’s painting room, Papunya, 1972
Shorty Lungkarta Tjungurrayi, then 52 yr old, was a member of the 1972 painting club. In his ‘Water Dreamings’, he painted the distant region of his youth. Water Dreamings can be openly shown unlike secret men mythologies that were displayed during the NYC exhibition in a separate room. At the entrance, a message warned Aboriginal women not to enter there. These secret boards are reproduced in a separate, removable folder within icons of the desert. (Women, too, possess secret mythologies).
Researching classical pigments, a British journalist visited Australia on her quest for ochre. In her book COLOR, a Natural History of the Palette she writes about contemporary Australian Aboriginal painters, many of whom are women. She also visited the schoolteacher who created the 1972 painting club and thereby provided the impetus for popularizing Australian Aboriginal art.
An explanation of Dreaming is given in COLOR, a Natural History of the Palette:
Traditional Aboriginal life only makes sense in the context of the time when Ancestors first arose out of the original mud or sea or sky and brought the first sunrise with them. In English it is articulated as the “Dreaming” or “Dreamtime” – a dream in the sense that it is not set in the past, but a kind of parallel present universe, rather like the one that we operate in while we are asleep. In Aboriginal lore, the Dreaming is the reason for everything that has ever existed and ever will exist. And its stories are told in layers, depending on how ready, or authorized, the listener is to understand them. It is said that your personal Dreaming depends on where your mother was when she first felt you in the womb. The Ancestors who live in that place have given you “anima” – they have animated you – and when you grow up their stories and songs will be in your trust, and you in theirs.
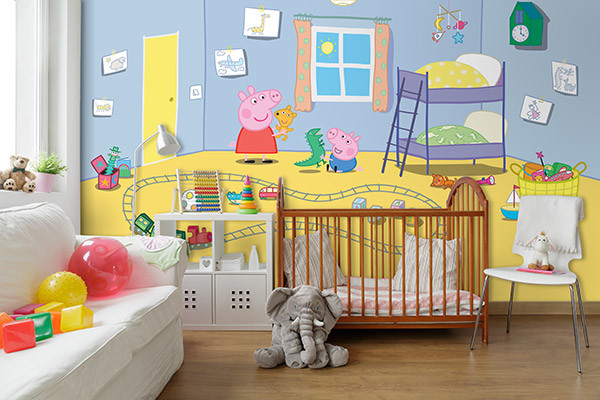
Painting a mural for your child’s bedroom can create a unique environment for your son or daughter. The choices for mural topics are endless. My wife and I have painted murals in two bedrooms in our house. If you would like to do the same, please consider the following tips based on our experience.
Tip1: Choose a Theme for the Mural
Themes can range from bumblebees to trains to Disney Princesses. The sky is the limit! However, when painting a mural for your child’s bedroom, consider how long the child will enjoy the theme. Your five-year-old daughter may love Little Einsteins now, but will she two years from now?
When our daughter was born, we painted a jungle theme for her bedroom, complete with a pink elephant and a yellow giraffe on the walls. Our daughter is almost four and still loves her bedroom. We just finished another mural of Mulan in the spare bedroom because we are expecting another daughter in three months.
Tip 2: Get your Equipment
Painting a mural for your child’s bedroom is so much easier when you have access to an overhead projector. Using an overhead projector allows you to draw your mural on a smaller scale, like 8 ½ inches by 11 inches, which is much easier than drawing on a wall free hand. Also, using an overhead projector allows you to just print a template off the internet, if you find something you like.
I am a fairly artistic individual, but when painting a mural in my daughter’s bedroom, it still would have been difficult for me to get the proportions correct when drawing large figures on the walls. Using an overheard projector allows you to get these proportions correct and also allows you to appropriately space out figures, trees, and other objects on the walls.
Tip 3: Trace in Pencil
Yes, it is quicker to just start painting, but my tip is to trace in pencil first. This is time consuming, but so is painting a mural for your child’s bedroom in the first place. If you wanted to save time, you would have just bought some border and some large wall clings and called it a day instead of spending hours working on a mural.
Tip 4: Pick your Paint
Many different paints can work when painting a mural for your child’s bedroom. Much of the decision boils down to personal preference. We have used both Dutch Boy Dirt Fighter acrylic latex paint and Apple Barrel acrylic paint. Both paints applied well, but they required two coats, as expected. We used a variety of brushes, including traditional brushes, rollers and sponge brushes. My tip is to buy a variety pack, especially if your mural includes very intricate details.
Tip 5: Outline Correctly
Unless you are going for a bold, comic-book type mural (think Superman bashing through a wall), do not outline the characters and details in black. The outlines will be too harsh. For a softer, more organic feel, mix the color with a little bit of black.
In our daughter’s bedroom, the pink elephant is outlined in a darker shade of pink. The yellow and orange giraffe is outlined in a dark orange. This technique works with all but the darkest colors. With very dark greens, browns and blues, you may need to use black to outline the details.
I hope you consider these tips when painting a mural for your child’s bedroom. Your child will appreciate a special bedroom of her very own!
Thank you for reading this article! If you have any further questions about this topic please contact us.
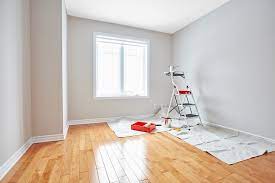
One of the quickest and easiest ways to change your rooms and put your personal stamp on them is to paint them. Interior painting tips like those below can help you revamp your home all by yourself. Although it is easy to find a painter to do the work for you, painting a room yourself is much less expensive and need not be a difficult task. Your local paint and/or hardware store has knowledgeable staff who can explain and help you choose the type of paint and the correct amount you will need. Additionally, here are some hints from my experiences painting to make your work easier.
Interior Painting Tips
1. Take the screws from the outlet and switch plates you removed and tape them to the piece itself. No more losing those little screws or trying to match them to the appropriate plate.
2. Make sure you have a pack of razor blades. If you get paint on a glass window, glass door, or tile you can just scrape it off when it dries with no fuss. They are also useful to cut through layers of paint if you have old casement windows who get painted permanently shut.
3. Carry a wet cloth (I use an old washrag) to use on little drips or “errors.” It’s handy and can save time later. It’s especially useful for doorknobs or window handles that might accidentally get a swipe of paint on them.
4. Have plastic bags or plastic wrap easily available in case you have to leave the scene – for a break, answering the phone, answering the door, a quick email check, whatever. Wrap your brush and/or roller with it so it stays moist and supple. Sometimes distractions take longer or time flies and if so you won’t come back to stiffened implements. I save the plastic produce bags from the market which are perfect for this.
5. Wear head covering! It’s much easier to clean a cheap shower cap or bandanna than to keep washing your hair until you get the paint out. You will get paint in your hair! You can reuse the head covering when you paint again.
6. Write the color and brand of the paint in pencil somewhere it won’t show. I usually write it on the back of one of the outlet plates with a sharpie. Those paper samples you intend to keep can easily get lost. It might also be useful to note the amount of paint used for the room.
7. When rehanging something on your walls, put a small piece of cellophane tape where you intend to sink a nail or screw. This will keep the paint/plaster from chipping and/or cracking. (Likewise, if hanging something on wallpaper, cut a small “v” at that spot and nail right into the wall. Then when you remove it you can just push the wallpaper back in place and it shouldn’t show.)
8. Put a little of your paint color in a baby food or other small jar and seal it tightly and store it with your cleaning supplies. Keep it handy for future touch ups. Yes, you are going to save what’s leftover in the paint cans but we all know garages “hide” things when we need them. You can purchase a cheap set of brushes perfect for touchups. Check out the school supply section of a general merchandise store for an inexpensive set.
9. Drape a cloth or cloths over your ceiling fan when painting your ceiling. I took my blades off once and shocked to see all the paint on the tops of them.
10. I was once successful in keeping little gnats and bugs off my wet, fresh paint by putting in a little citronella in the paint. It didn’t affect the paint but gave off that citrus smell that bugs don’t like.
Green Tip: Check out the low or no VOC (volatile organic compounds) paints – good for you, and good for the planet!
Thank you for reading this article about interior painting tips! If you have any further questions about this topic please contact us.
Born and bred in Huntington Beach where the sun-soaked suburbia, and cityscapes inspire his ironic and nostalgic compositions, John Deakers commits to layering – he layers paint, mixed media, three-dimensional figures, and different planes of realities.
Focused on subjects like peg-legged Icarus-types, to angsty one-eyed teens, Deakers does not immortalize typical heroes; rather, he deicts the characters at their lows, or amidst the mundaneness of everyday life.
Don’t Worry Baby
Altering the Southern California image of sparkling clean glamour, Deakers creates images of disillusioned adolescence. With a tone of despair, in “Don’t Worry Baby”, a forsaken figure leans against the side of a white truck, as the boy’s backdrop is a pixilation of rectangular images together making a row of houses.
The dedication to a rectangular composition in “Don’t Worry Baby” introduces the work of quilting in layers of paint, like layers of fabric. As he compiles overlapping squares to create the sky he mixes blue with the sparse gray and brown for the smog-ridden atmosphere. The layering tradition is repeated in the boy’s pants, as Deakers mixes actual jean and other media to explore texture and textiles as an element of layering in aesthetic experience.
As if in dialogue with the iconic Los Angeles painter, David Hockney, Deakers refutes what Hockney favors in his persistent and even delirious embrace of a world constituted. Exaggerated and imbued with garish tones that heighten compositions to the brink of cartoon, Deakers layers in familiar pop culture entities like Seven-Elevens to ground them in current reality. Like Edward Hopper’s “Night Hawk”, the jarring florescence echoes the same image comment on the isolation of commercialism.
Justin Rudd Nonprofit
Deakers is currently sponsored by Justin Rudd, the head of a 501c3 Nonprofit Organization that promotes and sponsors beach cleanups, spelling bees and other community building events. While some of his work is traditionally worked on in his private workspace, John also creates out of a van, taking his pastels and brushes, and draws for an audience.
Tools of Artistry
Straying away from the traditional tools of artistry, Deakers paints off of pieces of cardboard boxes, like “Donuts”, in which he paints a donut shop with telephone wires in the foreground, and the reoccurring smog layering the composition once again. Seemingly made from the rings of a coffee cup, polyp-like clouds envelop the top section of the image, layering in a heaviness of paint, but a depth of atmosphere, like sfumato on acid.
Deakers’s collection of layering continues with his three-dimensional painting structures. The “Orange Juice” piece’s two-dimensional composition is imbedded in a crate of oranges, as the boy breaks through the fourth wall of the two-dimensional image and reaches for the orange above him.
With a fresh-squeezed practice of multi-media layering, John Deakers expands the painting aesthetic beyond the brush and canvas. Reigning from Southern California, Deakers harnesses the California experience: with his imagery of familiar California suburbia, but intertwining the ironically angsty yet fantastical, he coats in multiple levels of emotionality through his commitment to layering.
We hope this article was inspiring for you! Please contact us if you have any further questions about the layering technique.
Art is play for young children. Providing art experiences to children allows them not only express themselves but to develop fine and gross motor skills as well. These preschool painting ideas can help you give them fantastic learning and fun experiences!
Paper
Offering a wide variety of preschool painting ideas for your kids will help them be super happy little beings! Paper is the first thing you will need in big supply as it is important for experimentation. Posterboard, tracing paper, butcher paper and cardboard are all nice to have on hand. Try cutting the paper into a variety of shapes, circles and long triangles often produces interesting results. Children may enjoy kneeling over a piece of paper on the floor, standing up at an easel or sitting at a desk, or if you are brave, tape a large piece of paper along a wall or fence.
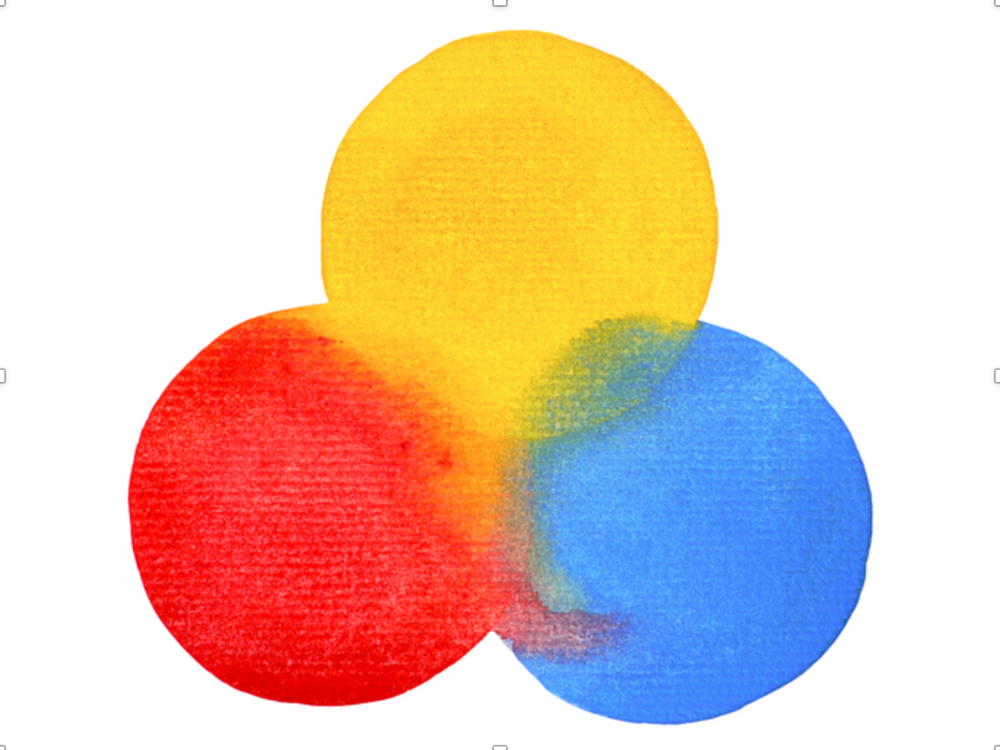
Color
To allow for success, offer colors that mix well together. Primary colors (red, yellow and blue) all mixed together create shades of brown. Try offering just two colors at a time and encourage conversation about what happens when the colors are mixed. Paper plates make great pallets. Washable tempera paint is versatile and readily available at discount stores.
Brushes
One way to encourage children to create art is to offer ways for children to get paint to paper that allows freedom from depicting images from life and concentrates more on play and experimentation. Some of these creative brushes include: feather dusters, tooth brushes and Qtips. Dipping toy cars in paint and allowing them to drive along a long paper is great fun. Play some music and have children drum onto paper with paint covered hands. Mix paint with a small amount of water in a spray bottle, hang a piece of paper along a wall and let children spray the paper.
Hang art work in a prominent spot to bolster a child’s self confidence. Most of all, approach art making with a sense of wonder and fun.
Thank you for reading this article! If you have any further questions about this topic please contact us.
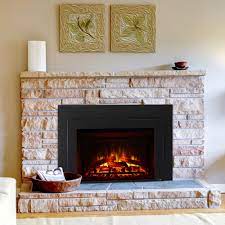
Painting the hearth is a great way to change the look of the fireplace and fireplace hearth.There are many reasons people decide to paint their fireplace hearth, including wear or unavailable replacements for brick or stone.
Preparation is tedious, but important. Measure the area you will be painting. The hardware store will be able to recommend how many gallons of paint are needed for your project when you tell them the area to be covered. The hearth needs cleaned, which means the entire fireplace should be scoured clean. Make any repairs to brick, stone, or mortar after the initial cleaning, being certain to clean up any accidental spills or cement. Based on past experience, I recommend a full twenty-four hour period of drying time. That minimizes paint bubbles and peeling.
Cleaning the Hearth
Spread several drop clothes around the hearth, to keep the flooring or carpet clean. Brush or vacuum the area to be painted. TSP (trisodium phosphate) is a great cleaner and degreaser. It also works wonders with smoke stains and soot. Use a nylon scrubber and scrub brush. Because TSP can sometimes irritate or burn hands, wear rubber gloves. You can get the scrubber, scrub brush, and gloves at your local Dollar Store. TSP can generally be found at your local hardware store. If you are young, ask Grandma or Grandpa. TSP was a household cleaning name way back when. It was the perfect cleaner for asphalt tile.
Painting the Hearth
Leave the drop cloths to protect the flooring and items that can’t be moved. Use masking tape as an edging around the hearth and fireplace (do not get any paint on the inside of the fireplace). I use ¾” tape to be on the safe side. Meticulous people can get by with ½” tape. This is often available at the Dollar Store, and always at the local hardware store.
If you have a flat or slightly-textured surface, you can use a regular paint roller. If it is more textured, as in bricks or stones with strips of mortar in-between, get a roller with more nap. If you are painting the entire fireplace, get an extension pole for the paint roller, as well. You should also have available a durable stepladder. Purchase them at the hardware store.
If you are painting brick that has not been painted before, use primer first, letting it dry overnight. If the hearth gets a lot of use, apply two coats of paint. When repainting, a semi- gloss with primer added will do. I encourage the use of semi- gloss because high gloss paint really brings out imperfections. If you intend to keep the same color for the rest of time, buy enamel paint. If you are like me and think you will change your mind in the next few years, buy acrylic. It is easier to paint over or remove. Also, water easily washes acrylic paint off the rollers.
The Home Depot, True Value, and Lowes are excellent hardware stores for supplies. They usually have guidelines or a class scheduled for do-it-yourself projects. Many WalMart stores also carry home improvement supplies.
Thank you for reading this article! If you have any further questions about this topic please contact us.
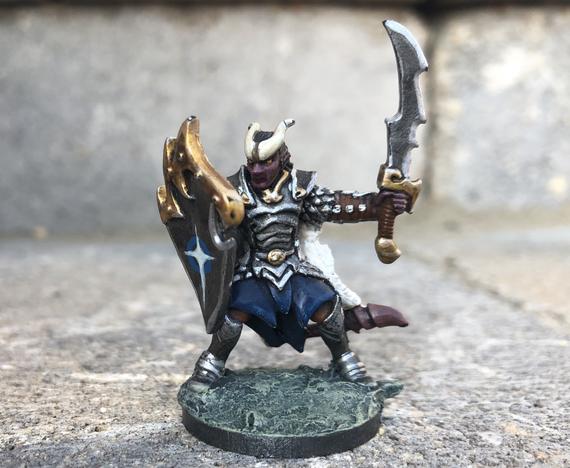
Once an RPG miniature figure is painted and detailed, it is ready to be displayed. However, much as the drybrushing technique can be applied to improve a figure from decent to special, there are three final details that can take a special figure to the level of professionally finished.
It All Comes Out In The Wash
Washing an RPG miniature figure isn’t a way to clean it, but to dirty it. By applying a final coat of diluted pigment the folds and creases of a figure are deepened and enhanced and by contrast, the raised areas are highlighted.
There are two methods of washing miniatures:
Ink washes employ a diluted (usually a 1:1 or even more diluted) solution of ink to the figure. Each section should be washed separately and the artist needs to take gravity into account since the dilute solution will tend to wind up most intense at the lowest point. For example, when washing a cape, lay the figure face down and wash the entire cape so that the wash pools in the depths of the various folds of the cape. Use an ink colour that is slightly darker than the the colour being washed. If done correctly, the ink will slide off the high points and adhere in the shadowed low areas.
Paint washes are applied in the same way. Darken the main colour that was used on a feature with a dab of black paint and water the paint down to a consistency just a little thicker than water. The application process is identical to the process used for inks.
Washing takes a great deal of practice and not all painters use the technique. It can produce amazing results if done correctly. It should be noted that the paint wash is basically a reverse version of the three step drybrushing process detailed in Part 4 of this series. Beginners might be more comfortable using the simpler, less messy drybrush technique.
Covering All The Bases
The base of an RPG miniature figure is often left out of consideration. It should not be treated as an afterthought.
Incorporating the base in the early planning stages of painting the figure will save time puzzling out what to do with it once the figure is done. There are two basic ways to approach finishing the base.
Painting the base is the simplest way to finish it. In the early days of figure casting, all figures had metal bases that could easily be painted, just like the rest of the figure. If the figure in question has a metal base, or better still a metal base that has some detail to enhance the figure, a simple paint approach can give the figure a perfect finish.
Flocking is the technique that railway modelers use to create the grass, sand and gravel effects that surround railroad dioramas. Flocking is available in bags at most hobby stores. Simply pick a colour of flock, paint some glue (two part, five minute epoxy works well for this) on the base, taking care not to get any glue on any part of the figure that is attached or close to the base. Cover the wet glue in flock and let dry. Sand can be used in place of flock. It helps the finish to paint the base a similar colour to the chosen flocking colour first. The flocking technique works best with the modern “slot base” figures, but it works fine on metal bases too.
Seal the Deal
Finally, a sealant should be sprayed on the entire RPG miniature figure to finish it. A good sealant will help protect it from fading, chipping and repel dirt and oil from hands. Any art supply or hobby shop should carry several different matt finish sealants that will do the job.
Metal miniatures may be small, but with patience, practice and perseverance, painting and displaying them can a hobby worth the time.
Thank you for reading this article! If you have any further questions about this topic please contact us.
The primary task of phlebotomy is to ensure the health, safety and welfare of the individual from which he or she is to collect a specimen. An essential part of this process is to be aware of and sensitive to the concept that, although it is vital to collect a valid specimen, cultural differences need to be respected and accommodated. A phlebotomist’s review of the cultural norms of Muslim women is well worth the effort in order to ensure proper specimen collection.
Any phlebotomist working to implement a larger practice of Phlebotomy in a wide metropolitan area will most likely be repeatedly presented with patients who are of a culture different from their own. For example, in 1988 according to the book entitled Culture Care Diversity and Universality (Leininger, M.M. & McFarland,M.R., 2006), Arabs were the fastest growing minority population in Michigan and the third largest minority group overall in the U.S. Ninety-two percent of Arabs in the world consider themselves Muslim and as of 1999, it was estimated that the Arab population in the metropolitan Detroit area alone was over 250,000. With minority populations such as these, providers of healthcare need to train their employees in cultural diversity and have proper procedures in place to provide quality patient care to all.
Potential Barriers to using Phlebotomy and Achieve Successful Blood Draw
There are several areas where it is possible to see differences between Muslim culture and the general culture that is found in the U.S. Perhaps the most obvious difference is the possibility of a language barrier between Muslim patients and healthcare providers. Female Muslims in particular prefer to have same-sex interpreters. These same-sex interpreters should also be sworn to confidentiality with regard to any communication between the patient and healthcare provider that they may help to assist. Whether or not a translator is necessary, Phlebotomy practitioners should be encouraged to inquire of the patient culturally focused questions to determine how best to maintain their religious and/or cultural practices in order to avoid refusal of treatment (Leininger & McFarland, 2006).
There can be challenges in even attempting to initiate conversations between the Muslim patient and phlebotomist. An article entitled, Muslim Women and the Veil on the Islam Watch website (Asghar, M., 2008, para. 2), notes that Muslim women are to keep their gaze lowered in order to “guard their modesty.” Once again, healthcare providers need to be properly trained and follow effective procedures in order to facilitate the best possible communication between patient and provider which is so vital in a healthcare setting. In this type of situation, understanding that eye contact with Muslim women should be avoided will go a long way to avoid the possibility of offending a female patient, and perhaps offending her husband as well.
Healthcare providers who are sensitive to the needs of a Muslim woman may make the difference between her receiving the medical care she requires or having her refuse medical treatment which may be vital to her health. In order to accomplish this, all healthcare providers, phlebotomists included, need to be aware that modesty is of the utmost importance to Muslim females. Muslim women, along with their husbands, prefer that Muslim females are treated by members of their own sex and may refuse treatment if the only option if to receive any type of treatment from a male employee. The author of “American Health Care Professionals Should Respect the Traditions of Other Cultures” in Western Journal of Medicine (Galanti, 2000) recounts a story where prior to a surgery, a Muslim man refused to allow laboratory technicians to draw blood from his wife’s arm. The husband only allowed the procedure to be performed after he completely covered his wife’s body, with only an area of her arm exposed to allow for the collection of her blood.
Across cultures, there are nonverbal cues that should be respected by healthcare providers as well. In Muslim cultures, non-Muslims are to avoid shaking hands with a Muslim of the opposite sex. A handshake should only occur if first initiated by the Muslim. In order to avoid an occurrence of improper handshaking, a Muslim may either put both their hands behind their back or put their right hand over their heart in order to avoid skin contact. In addition, healthcare providers should take precautions to ensure they announce themselves before entering the room of a female Muslim in order for her to properly cover herself (Leininger & McFarland, 2006).
Achieving the Goal of Quality Patient Care
The duty of phlebotomists and all other healthcare workers is to provide the utmost in care in order for their patients to be safe and well. Those in the medical field need to understand that in order to assist in the effective treatment of human beings there are requirements beyond simply focusing on the functions of the body they are seeking to treat.
When healthcare workers possess attributes such as kindness, compassion and a willingness to embrace the differences of other cultures, they can have a tremendous impact upon whether a person recovers and becomes well again or continues to struggle with illness or disease. It should be the primary mission of every phlebotomist to do whatever is necessary to assist in the recovery and wellness of their patients
Thank you for reading this article about phlebotomy. If you have any further questions please contact us.
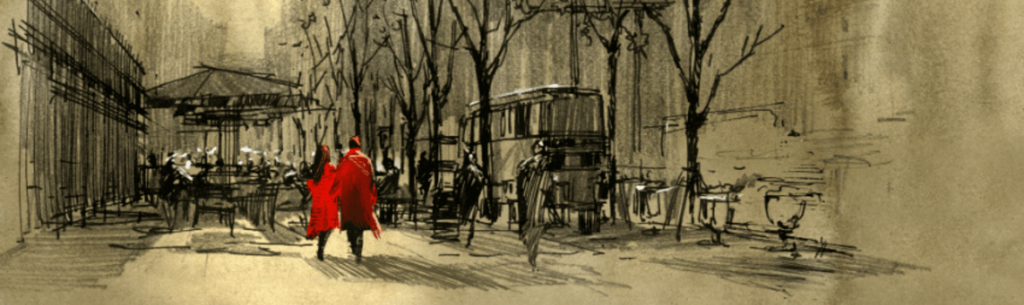
Whenever you paint cityscapes you will encounter a lot of people, some purposefully stroll past, others relax peacefully reading or sunbathing; however while they will be abundant in dense urban areas their presence will be extremely sparse in rural areas. Ultimately, the decision to paint figures in the remote countryside is at the discretion of the artist.
Watercolor sketches of figures are generally more effective when they strive to capture the essence of a particular moment; an impression of spontaneity and originality. Such sketches are useful in various ways; improving your fundamental life drawing skills; discovering which postures and compositional placement are aesthetically pleasant and learning how to render them so they appear natural.
The first step in learning how to paint figures in landscapes is to learn how to properly observe. Life drawing provides you with the opportunity to learn how to observe and comprehend human postures. Inevitably, this is a challenging task as your “models” will usually be mobile. If you find this difficult it is crucial that you focus on improving this skill through practicing quick, gestural outdoor sketching more often. Generally you have to learn to forget about detail and preconceived ideas and instead interpret the model using broad, sweeping strokes and adding only a few touches. If you focus on accuracy you risk overworking the piece and achieving a detailed yet static and artificial image.
Using a No.2 pencil, quickly draw the outline of a group of figures in a public place. Strive to capture their postures and interactions while omitting most of the trivial details such as clothing designs and facial features. Then, paint the neutral colors, focusing on both high contrasting colors in the group of figures and accurately depicting the shadow using the glazing technique. This creates compositional interest while ensuring proper tonal balance, an integral part of a harmonious successful watercolor painting. Moreover, the shadows can later be as reference when rendering details affected by the direction of lighting and reflective lighting cast on the figures. You can also make quick color notes using your own numerical system.
Thank you for reading this article! If you have any further questions about this topic please contact us.
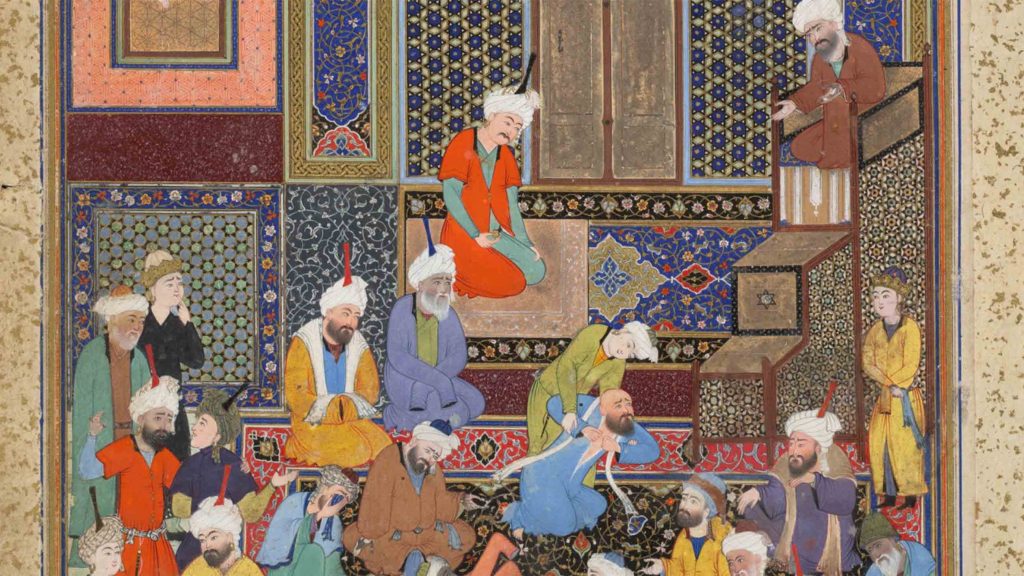
Little is written about modern Islamic art. It is clear that today’s artists are still inspired by cultural traditions and imagery from earlier Islamic periods. However, Afghan art of today is more clearly a means of personal expression, freed from traditional cultural rules in the post-Taliban era. Many of the Afghan master artists painting today do paint in more freedom, but have yet to be able to receive international recognition for their fine art paintings.
There are several styles of art which appear to be more popular for the Afghan master artists. Modern art paintings, colorful abstract art, and impressionism art are the most frequently found styles in the numerous art galleries popping up around Kabul.
Modern Art Paintings
There are at least four master artists painting in this style in Kabul today: Niazi, Faryad, Hamdard, and Ismael. Each of these brings his own interpretation to modern art. Some are clearly drawing from their own experience. Many artists fled during Afghan civil war of the ’90’s (the Mujahadeen war) and lived in refugee camps in Iran or Pakistan when the Taliban were in power.
Impressionist Art
Two of the most prolific impressionist artists are Hamdard and Shukoor. They have an amazing talent of highlighting the beauty of Afghan culture. If impressionism is defined as “seeing a scene at-a-glance,” it exactly describes how they describe their inspirations. They elaborated they never can stop to paint in the middle of the bazaar or crowd, because the people would crowd around them too much. They have to see a scene as they are strolling, and then go to their studio to paint.
Colorful Abstract Art
Abstract art is a newer art style less frequently seen in Kabul than paintings in Impressionism. The artists seem to be more influenced by Picasso. Cubism, geometric Abstract art, and partial abstraction would be more characteristic of the Master Afghan artists.
Classical Islamic Calligraphy
Calligraphy has been a consistent art form in Islamic history since it’s beginning dated to the 7th Century A.D. It typically is considered the highest form of Islamic art, based on the glorification of letters, words, or passages of Islam’s holy book, the Qur’an.
Thank you for reading our article about Afghan Art. Should you have any further inquiries please contact us.