Drybrushing Techniques
It is simple to paint a figure with a single coat of colour on each feature and detail. It takes some practice, but done with care even such a basic approach can yield decent results. With one simple technique, judiciously applied, those decent results can be refined into something very special.
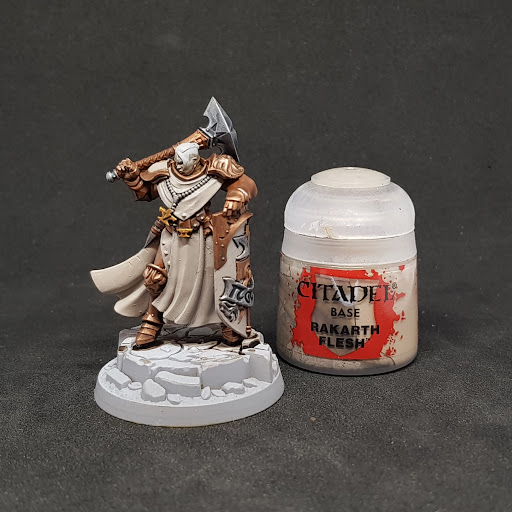
Drybrushing is the most effective method of making a figure’s various features appear more realistic. It takes a great deal of practice and over time each artist will find ways to refine the technique for various situations. The best miniature features to practice the drybrushing technique upon are capes and armour.
Capes
Choose a figure that is wearing a cape that has as many folds and ripples as possible. Once the cape is primed and a colour chosen, there are four basic steps.
- Mix the basic colour with a bit of black (or brown if the basic colour is red or orange) to make a dark version. Paint the entire cape this colour and allow it to dry.
- Next, take the basic colour on a shading sized brush, but brush off most of the pigment on some scrap paper until the brush strokes leave only a light shading on the paper. Use the “dry” brush to gently paint the cape, stroking across the folds of the cape, not pressing too hard. This will take some practice. The best approach is “less is more”. Several very light coats can be applied until the desired effect has been created.
- Once the main colour has been applied, the cape will look like it has deep shadows. Now lighten the main colour with a dab of white and repeat the drybrush technique, only with lighter strokes and an even drier brush. Again, this will take a good deal of practice, but the effects that can be achieved are worth it.
- At this point, the cape should appear to have deep shadows and the lighter highlights should look like natural light shining off the material.
- The final step is optional: take a tiny amount of pure white and apply it to the shading brush. Using the same technique as before, wipe off all but the last hint of pigment from the brush. With feather light touch, drag the brush across the very edges of the cape and the bottom edge. Done correctly this white touch will appear as a subtle wearing on the fabric.
Armour
Whether chainmail, plate armour, or another metal feature, the basic technique to create an appealing finish is the same.
- Once the figure is primed and dry, the first step is to paint all the parts that are meant to appear as metal with flat black paint. Be certain to get the black paint into every fold, every divot, every crevice. Allow the figure to dry thoroughly.
- Use steel paint, not silver, for armour and metal. Drybrush the steel across chainmail and over the folds in armour. In some cases, it may work best to brush in only a single direction, since this will have the effect of deepening the shadows in the metal. In other cases, swiping the brush back and forth might achieve a more interesting effect.
- For a final touch, a very light coat of silver can be drybrushed to give the metal a gleam at the highest parts of the feature. This isn’t a necessary step, and some figures may look better without it.
Drybrushing requires a lot of practice and a lot of mistakes before an artist can use it to create an effective finish, but once the technique is mastered it has infinite applications and variations.
Thank you for reading this article! If you have any further questions about this topic please contact us.